Moving Home Assistant from HAOS to Proxmox
I've had Home Assistant OS installed for quite a few years on an Intel NUC my dad found at a garage sale for $5. He then later gave it to me for my birthday, since he already has too much to tinker with at his house. It's an Intel BOXNUC7I3BNK, and has an i3 7100U, 16gb of RAM (Overkill), and a 500gb SSD, which I realize is way beyond overkill as I write this. Checking the System settings now I see a whopping 7% of the drive is in use.
I do have automatic backups going to a connected Unraid share, but I have no way of quickly restoring a backup. In the years since the NUC has been running Home Assistant, I've discovered, and moved all of my services to, Proxmox. Proxmox has had its own learning curve for me but has been amazing. I figured this is the time to transition Home Assistant to Proxmox. The question is whether to run it as a VM or a container.
VM or LXC?
As usual with these well-known, and well-discussed subjects online, I consulted Copilot to give me a pros and cons list. And it seems pretty clear cut.
A VM would match exactly how it's deployed now. It would allow the full use of the feature set, such as Home Assistant Addons (HACS) and it'd also be easier to pass USB dongles into the VM. The downside is it would consume some more resources, but nothing any of my nodes can't handle.
A container would allow me to allocate fewer resources to it. I would also be forced to move any addons in HA to their own Proxmox LXCs. This may be a benefit, though, as I could move those to different nodes if I needed, and update each independently of the other.
I am going to attempt the container route. I'll be using the Community Script for the container. The warnings on this script state that it sources scripts outside the community repo. After looking at the scripts, I am assuming it's Docker that is the outside source. But as usual, do your due diligence running third party scripts!
This seems to be the section that sources third-party scripts:
msg_info "Installing Docker $DOCKER_LATEST_VERSION"
DOCKER_CONFIG_PATH='/etc/docker/daemon.json'
mkdir -p $(dirname $DOCKER_CONFIG_PATH)
echo -e '{\n "log-driver": "journald"\n}' >/etc/docker/daemon.json
$STD sh <(curl -fsSL https://get.docker.com)
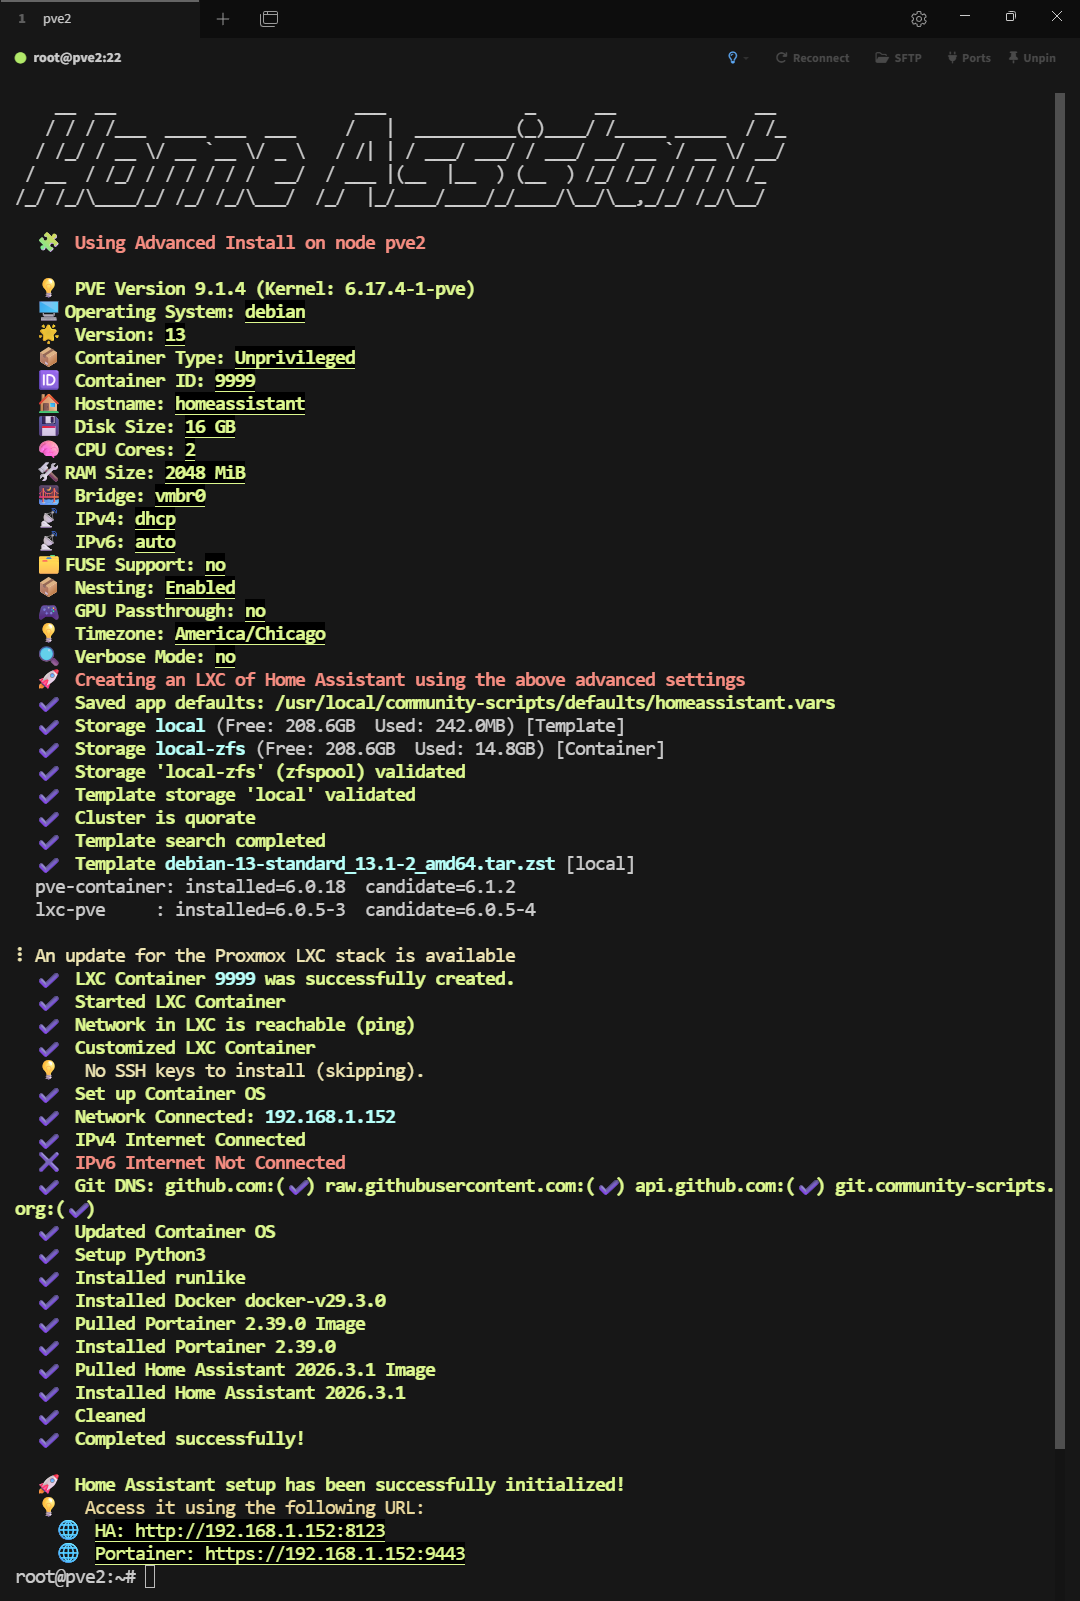
msg_ok "Installed Docker $DOCKER_LATEST_VERSION"I also decided I am going to start Home Assistant from scratch, rather than attempt restoring a backup. I've changed things so many times that some of my Tasmota smart plugs have the wrong names. I also forgot how I did everything with Zigbee2MQTT. So to refresh my memory, I'll redo everything. Since I didn't want to disturb my existing Home Assistant, I'm installing these on an existing node. I started with Home Assistant on my pve2 node:
I do have the Sonoff Zigbee 3.0 USB Dongle connected to the Intel NUC and secured to the side of my server cabinet with some Velcro, but I have yet to purchase any Zigbee devices. Because of this, I'll install Zigbee2MQTT after installing Proxmox on the NUC and getting these containers migrated. Since the install script handles the USB pass-through automatically, I need to wait until I can install the container on the correct node (the NUC). Maybe in the future I will look into the POE version, so it doesn't have to be tied to a specific node.

The only other addon I was using was Mosquitto. I have a handful of Sonoff plugs that I flashed with Tasmota, and those communicate via MQTT. I'll get this installed now on the same node I installed Home Assistant on, again with the community scripts:
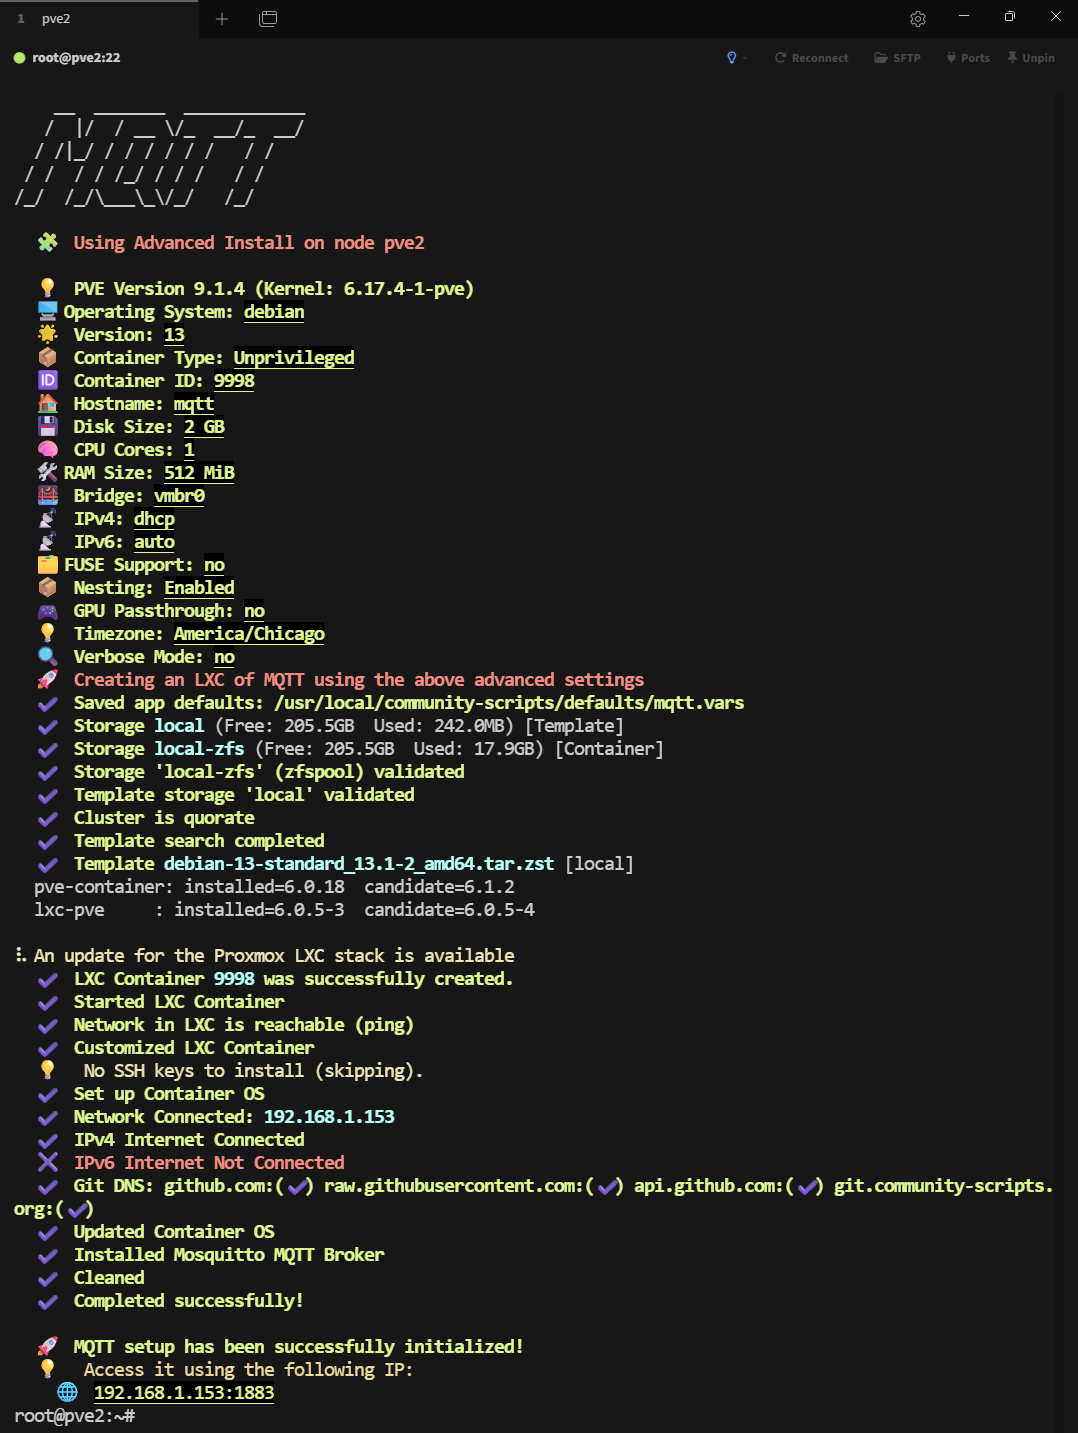
Following the post-install info, I set the password for my desired user. I simply reused the user and password I had saved from when I setup MQTT within my existing Home Assistant install a few years back. In my case, the user was simply mqtt:
mosquitto_passwd -c /etc/mosquitto/passwd mqttThen I changed the ownership of the newly created password file:
chown mosquitto:mosquitto /etc/mosquitto/passwdThen I restarted the Mosquitto broker:
systemctl restart mosquittoI now realize that since I want to start over with Home Assistant, I can't fully prevent any downtime with Home Assistant. I need to shut down the NUC and move it to my desk to prepare for Proxmox. I also want to swap out the drive and RAM. It does not need a 500gb drive and 16gb of RAM. I dug through my piles of hardware and found a pair of 4gb DDR4 SODIMMs, along with a 128gb SATA m.2 drive. I may repurpose the 500gb for my pve1 node, since that one is dedicated to Plex. And the video thumbnails take up a lot of room. Here is the SATA m.2 and 2x4gb of RAM properly recognized.
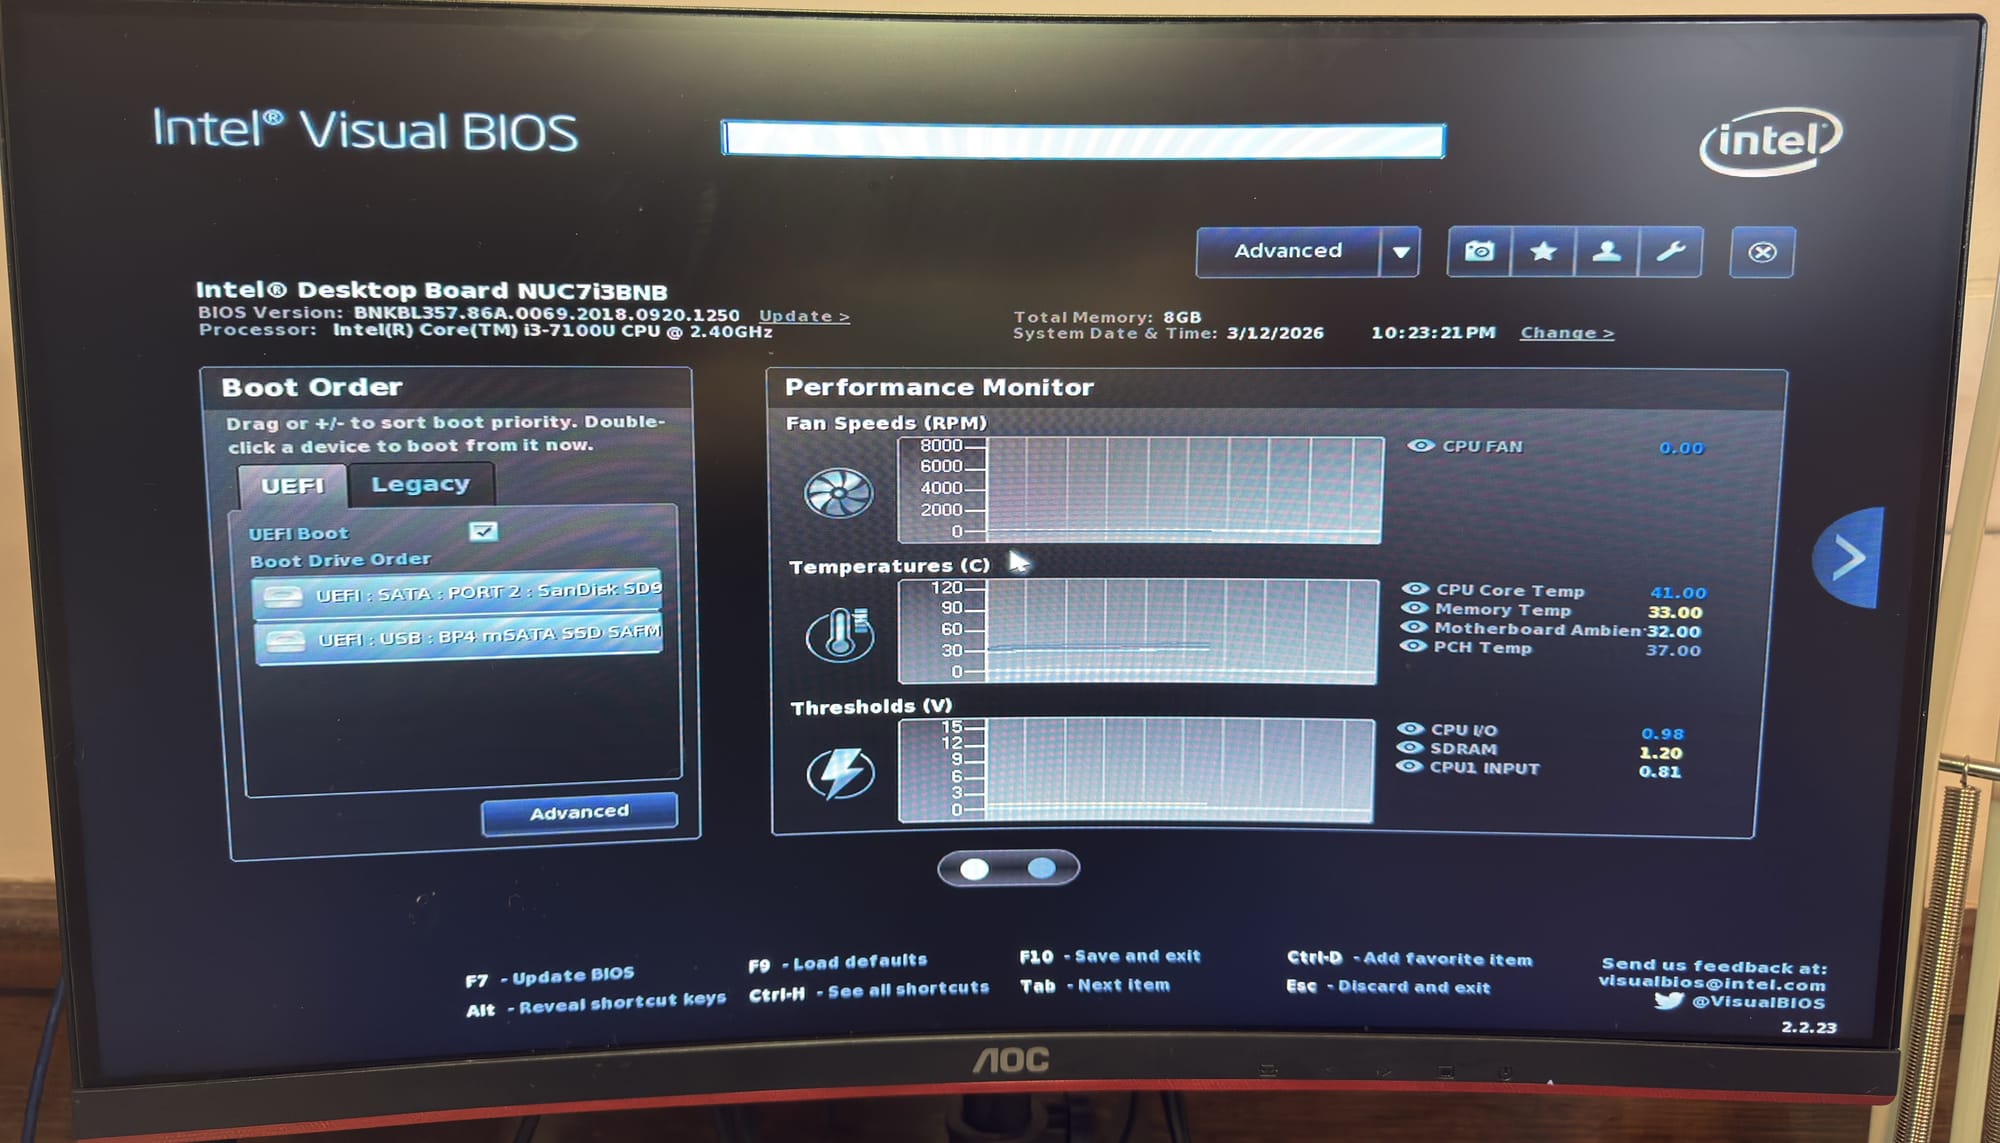
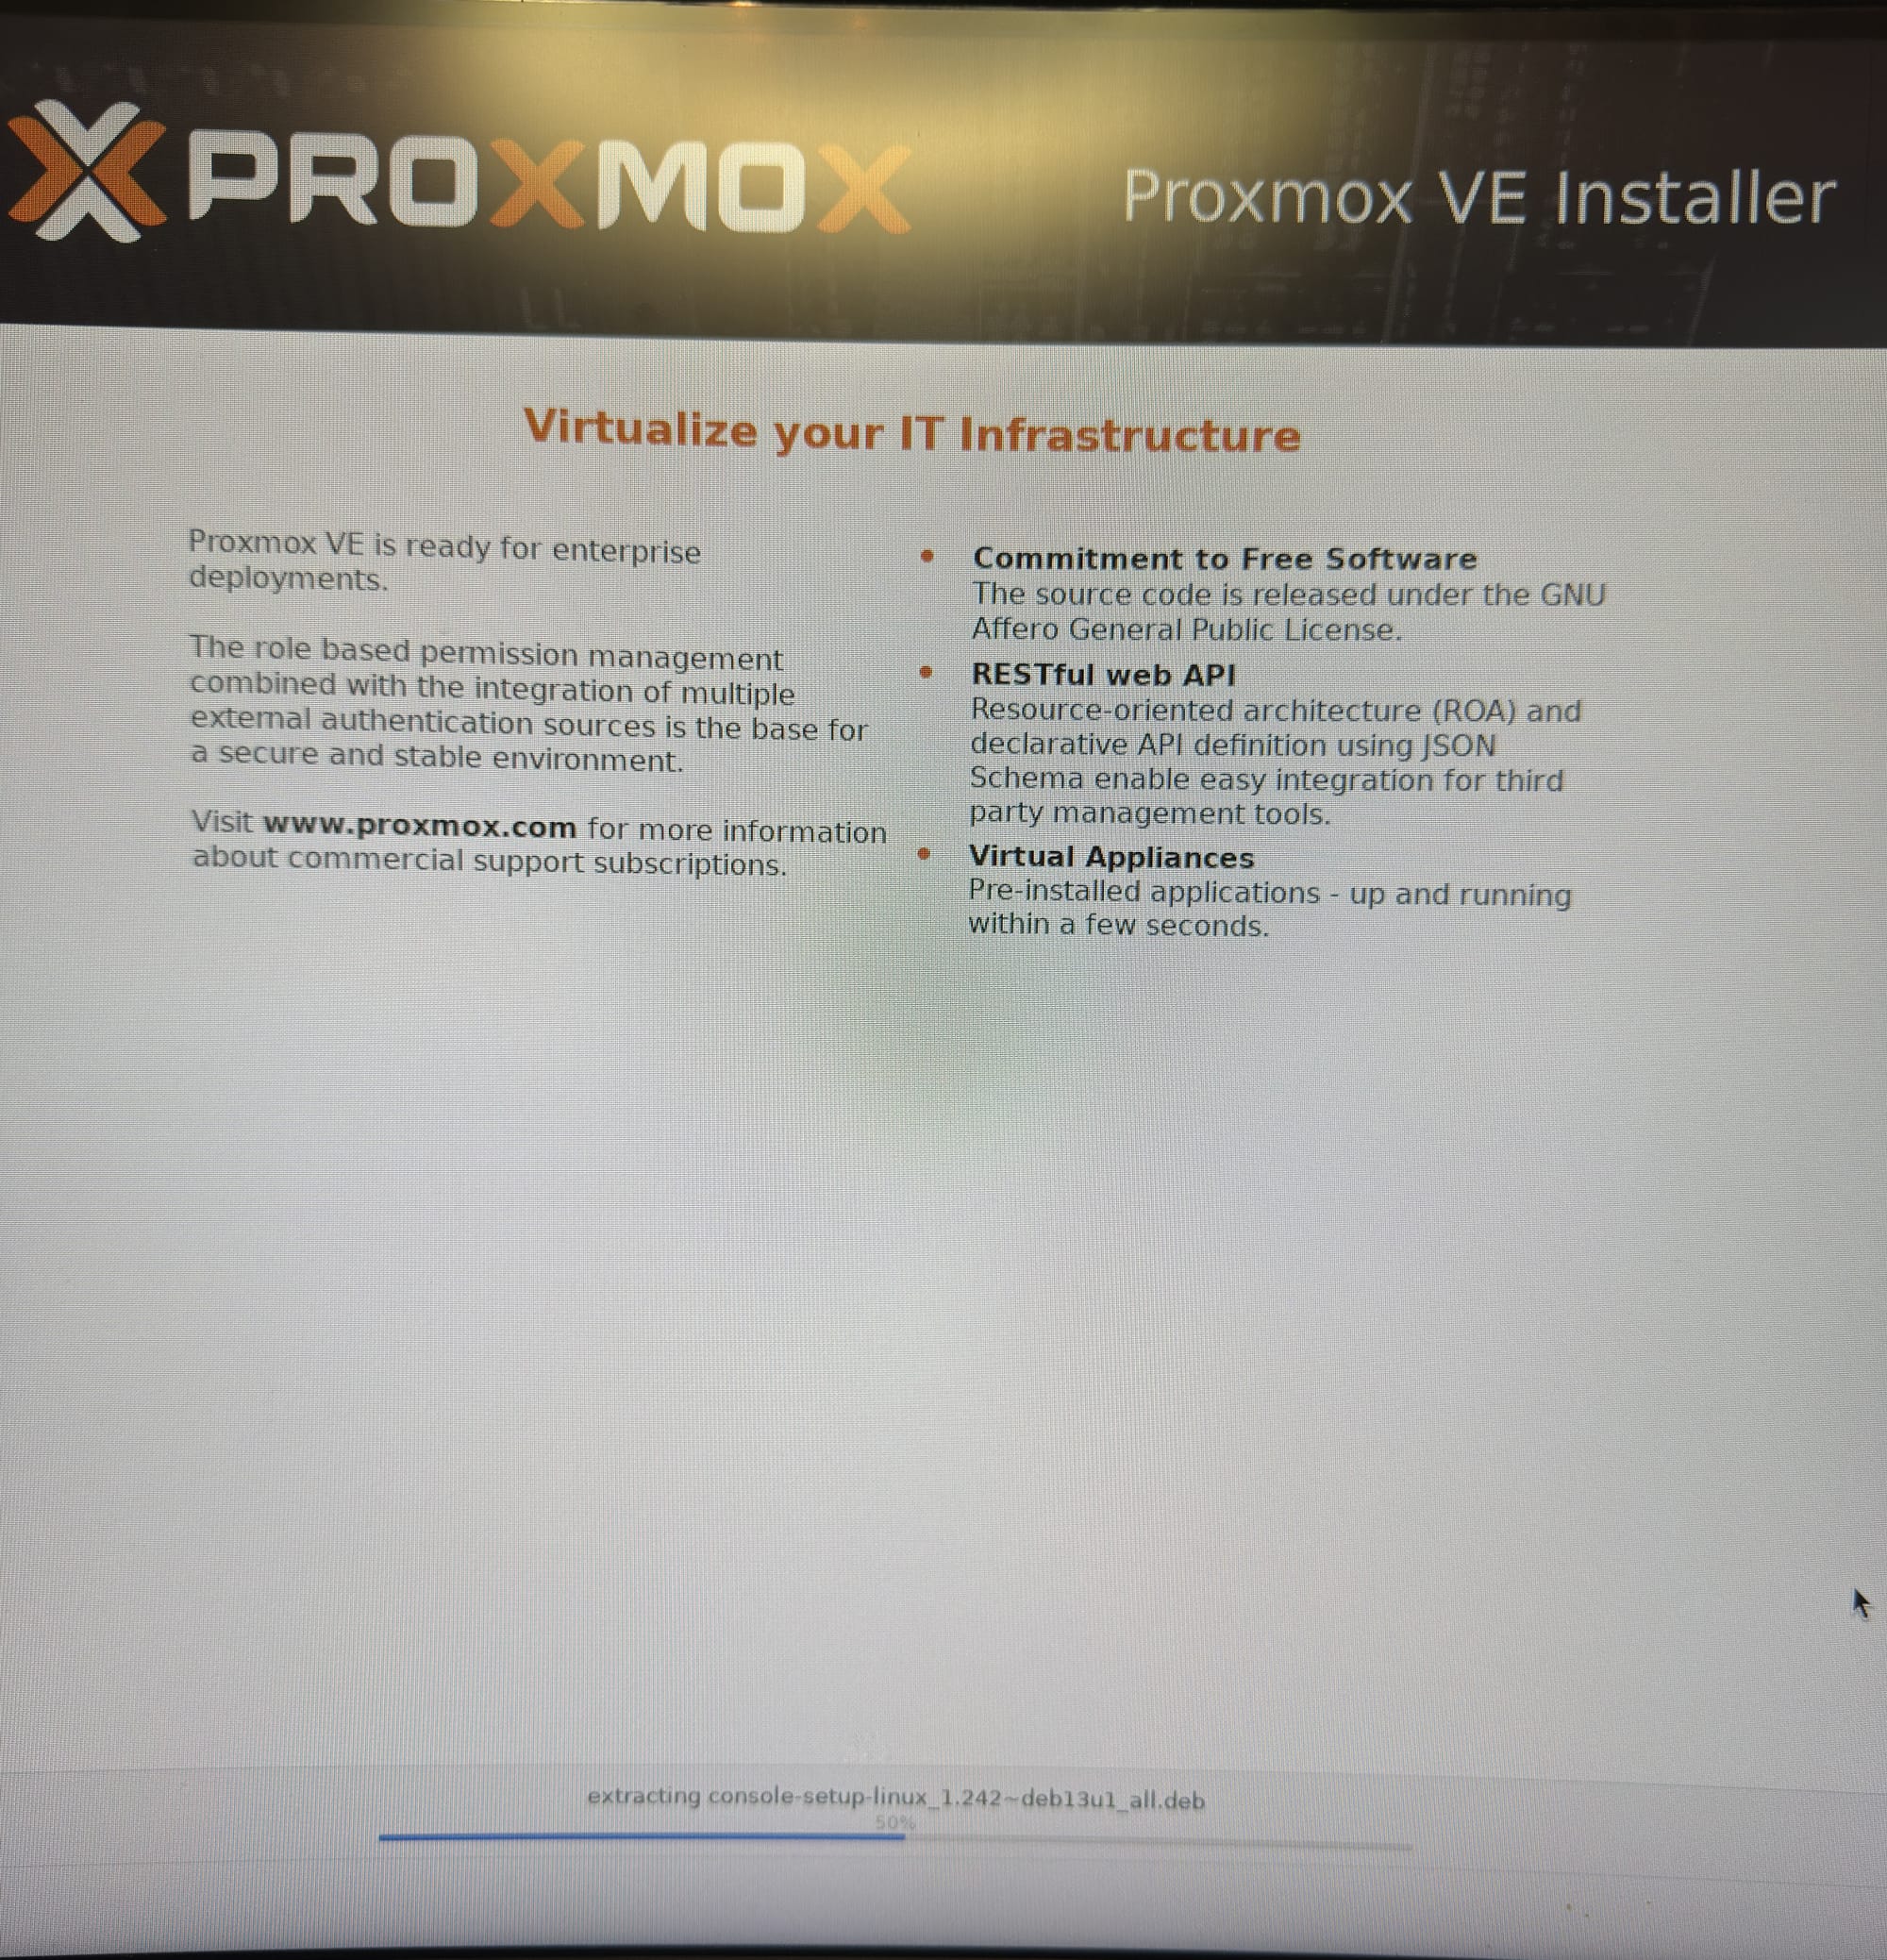
After booting the Proxmox 9.1 ISO from my Ventoy external mSATA drive, I proceeded to install it. I learned the hard way with my five-node cluster that choosing ZFS over the default ext4 (I believe) provides some added benefits, especially for snapshotting running containers, as well as migrating them between nodes. So, I chose ZFS for this node as well.
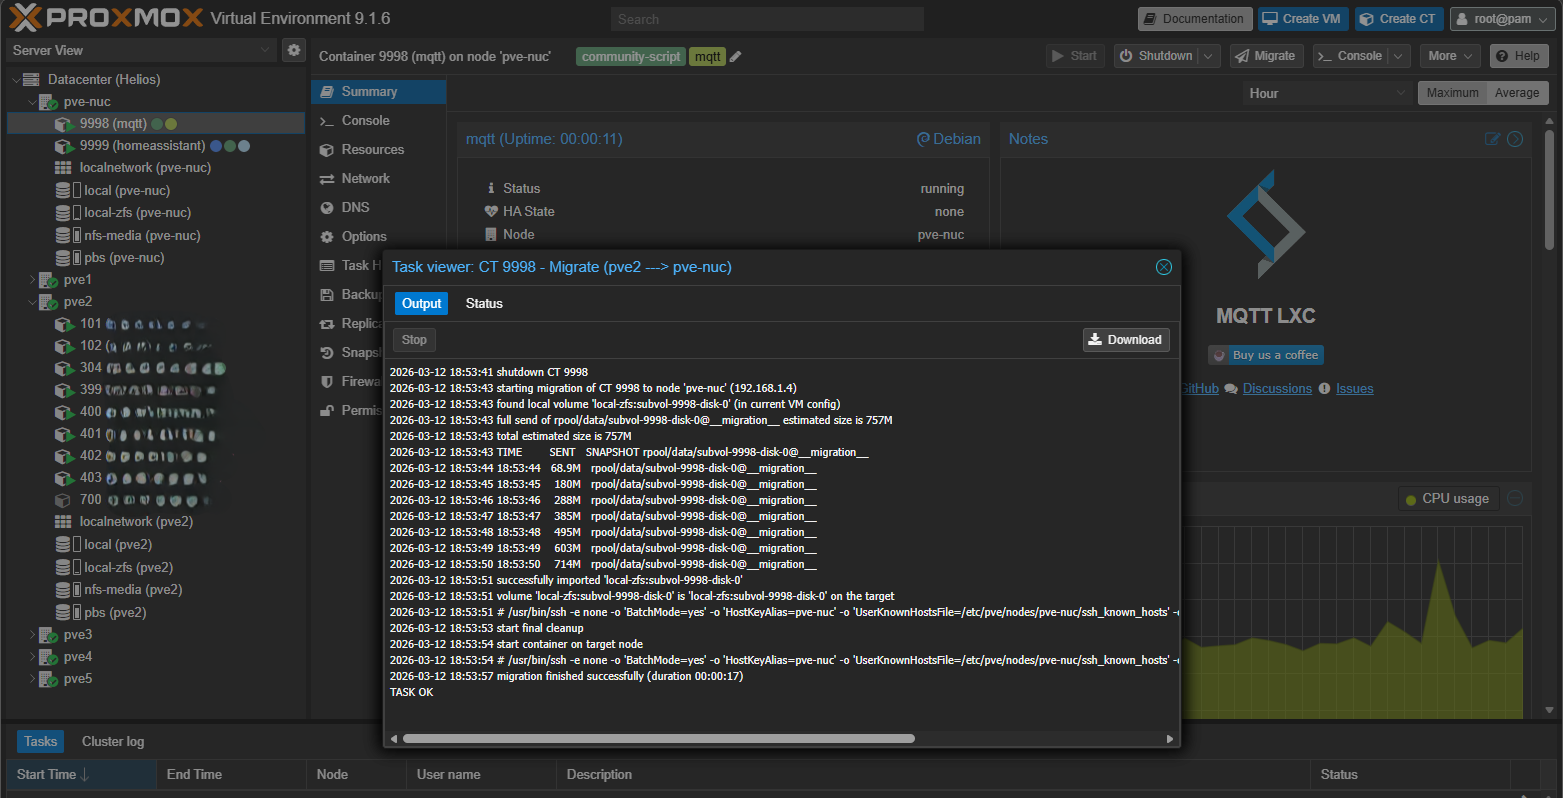
Luckily, I already had a DHCP reservation for this device in OPNsense, so it was handed the 192.168.1.4 address. This works out, since pve1 through pve5 are .5 through .9, with PBS occupying .10. I named this node pve-nuc, so I know that it refers to the, well, NUC. After adding it to the cluster, I migrated both the homeassistant and mqtt containers. Homeassistant took 1:01 to transfer, and mqtt took 17 seconds.
I went and grabbed the Zigbee stick from the side of my server rack and plugged it into the back of the NUC. I then installed Zigbee2MQTT, also from the community scripts. Just like with mqtt, this container has some post-install things to run. I retrieved the exact name of the Zigbee USB stick:
root@zigbee2mqtt:~# ls -l /dev/serial/by-id
total 0
lrwxrwxrwx 1 root root 13 Mar 12 18:51 usb-ITead_Sonoff_Zigbee_3.0_USB_Dongle_Plus_f069f0b79c0cee118c182dd6f49e3369-if00-port0 -> ../../ttyUSB0
Then I modified the configuration.yaml file:
nano /opt/zigbee2mqtt/data/configuration.yamlHere's how my config file looked before restarting the zigbee2mqtt service. I simply copied the config from the above discussion, removed everything in the config, then pasted the contents. Then I changed what needed to be changed:
frontend:
  port: 9442
homeassistant: true
permit_join: false
mqtt:
  base_topic: zigbee2mqtt
  server: 'mqtt://192.168.1.61:1883'
  user: mqtt
  password: redacted
  keepalive: 60
  reject_unauthorized: true
  version: 4
serial:
  # Location of the adapter
  # USB adapters - use format "port: /dev/serial/by-id/XXX"
  # Ethernet adapters - use format "port: tcp://192.168.1.12:6638"
  port: /dev/serial/by-id/usb-ITead_Sonoff_Zigbee_3.0_USB_Dongle_Plus_f069f0b79c0cee118c182dd6f49e3369-if00-port0
  # Adapter type, allowed values: `zstack`, `ember`, `deconz`, `zigate` or `zboss`
  adapter: zstack
advanced:
  pan_id: GENERATE
  network_key: GENERATE
  channel: 20
After restarting the zigbee2mqtt service via
systemctl restart zigbee2mqttthe config file removes the comments and generates the pan_id and network_keys:
frontend:
enabled: true
port: 9442
homeassistant:
enabled: true
mqtt:
base_topic: zigbee2mqtt
server: mqtt://192.168.1.61:1883
user: mqtt
password: redacted
keepalive: 60
reject_unauthorized: true
version: 4
serial:
port: >-
/dev/serial/by-id/usb-ITead_Sonoff_Zigbee_3.0_USB_Dongle_Plus_f069f0b79c0cee118c182dd6f49e3369-if00-port0
adapter: zstack
advanced:
pan_id: 51543
network_key:
- 78
- 15
- 253
- 189
- 44
- 238
- 248
- 203
- 233
- 231
- 223
- 123
- 108
- 205
- 0
- 27
channel: 20
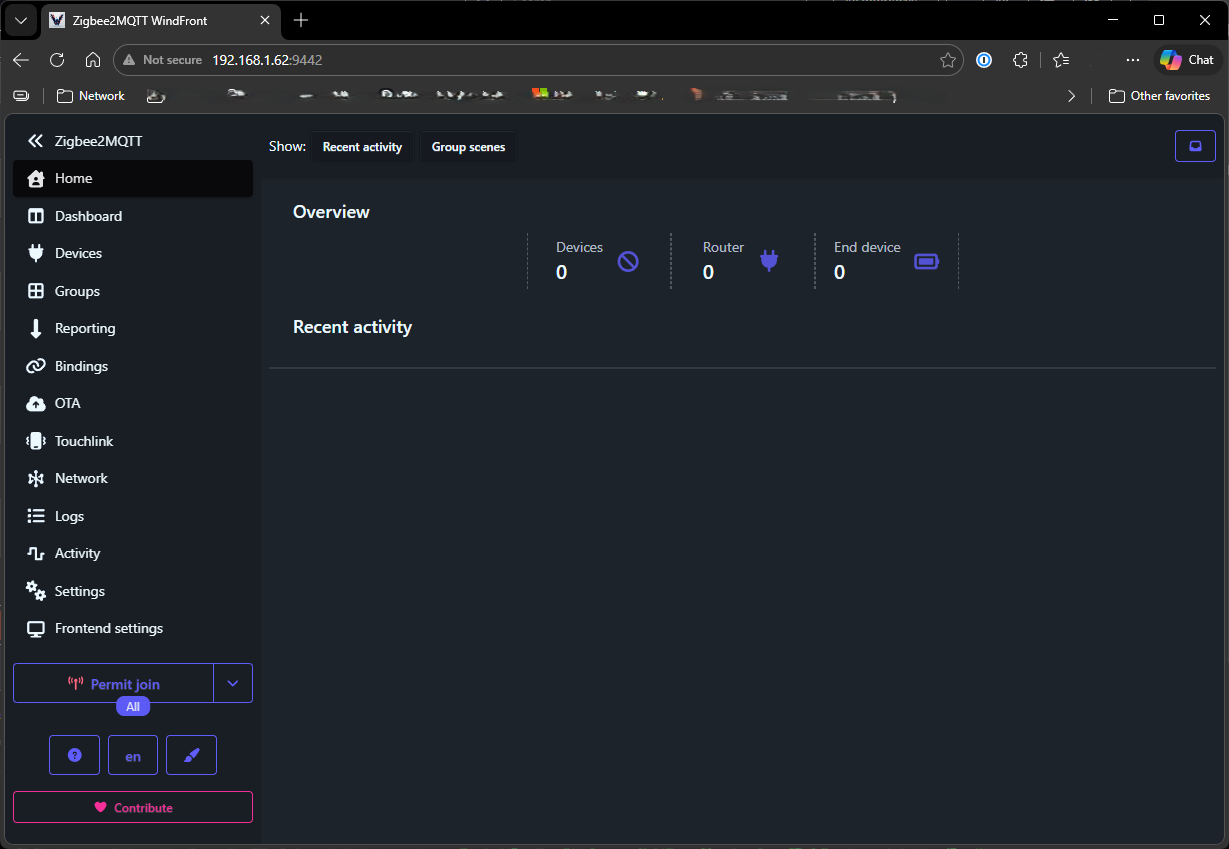
version: 5A few seconds after restarting the service, the webui is reachable. But since I don't have any zigbee devices yet, this is as far as I'll go.
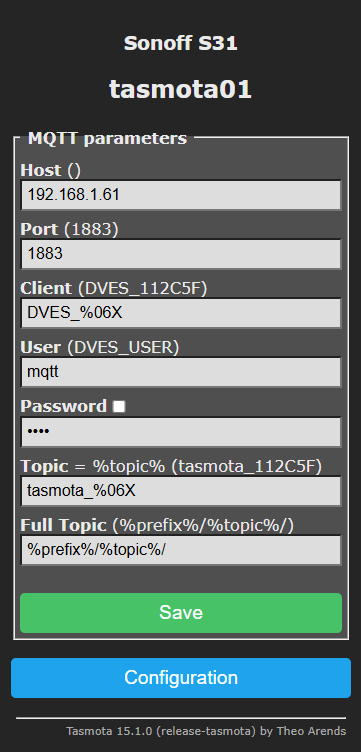
Home Assistant was previously running at 192.168.1.4 when it was a bare-metal install of HAOS. This also meant the mqtt broker was at 192.168.1.4. Now the only thing remaining at that address is the Proxmox host. My Home Assistant container is now at 192.168.1.60, and the mqtt container is at 192.168.1.61, both courtesy of DHCP reservations in OPNsense. This means I need to update the address within the UI of each Tasmota plug. Luckily, I only have six plugged in throughout the house. Here's what it looks like after updating them:
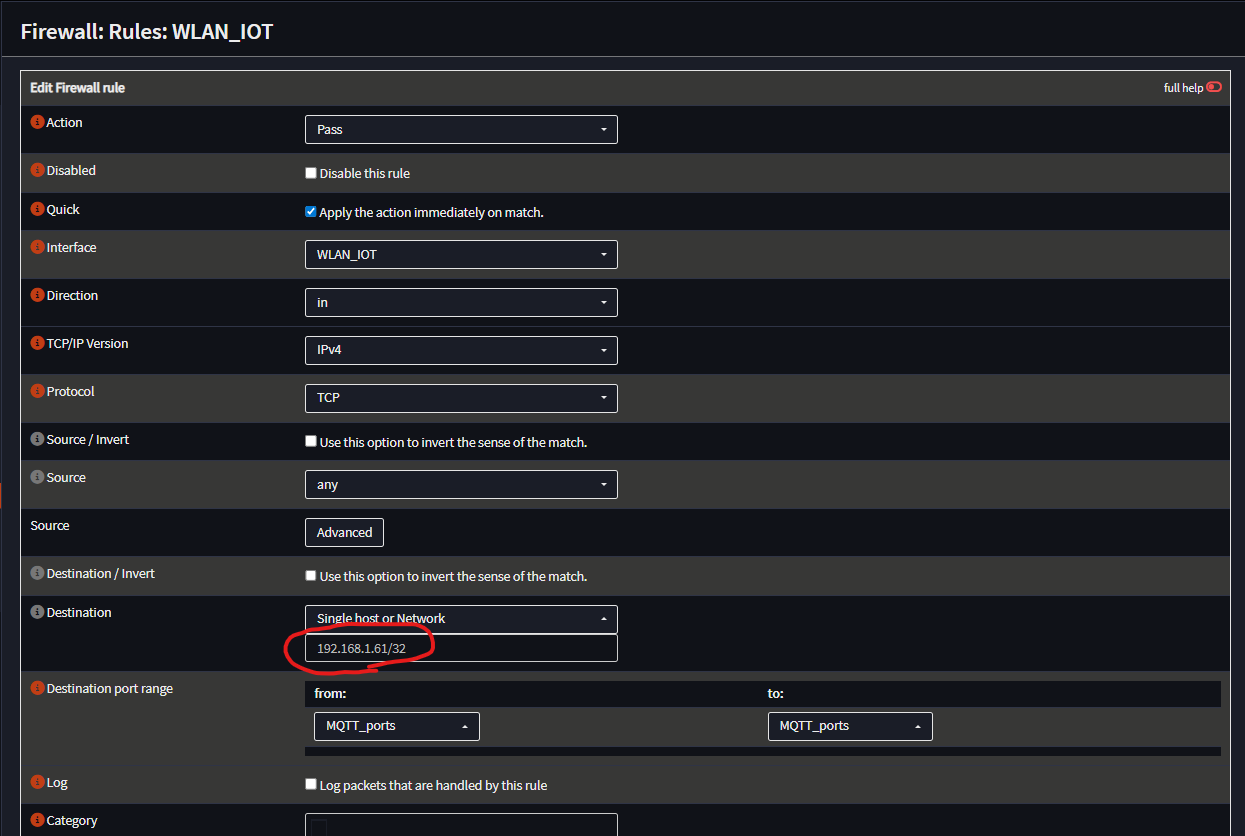
I have these on an OPNsense interface/VLAN called WLAN_IOT, which does not have internet access. I had a firewall rule that allowed this subnet (192.168.30.1/24) access to Home Assistant over port 1883, however it was still pointing to the old address, resulting in a multitude of blocked events, so I needed to update the firewall rule. Here's what the new rule looks like:
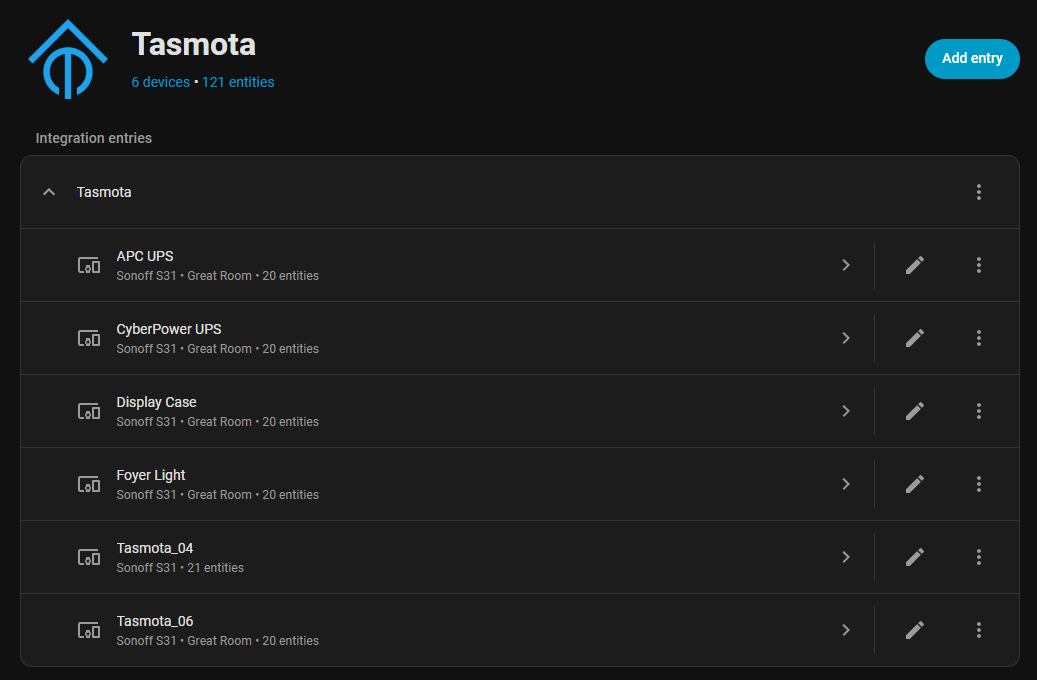
Now that the Tasmota plugs are successfully talking to the mqtt broker at 192.168.1.61, it's time to get them added to Home Assistant. I went to Settings > Devices & services > Add integration. I searched for and added Tasmota, and it successfully found all six of my plugs. Here I've already renamed some of them:
Now all I need to do is reconfigure some things in Home Assistant, like dashboards. That's it for now!
Member discussion